TESTING YOUR BLOOD
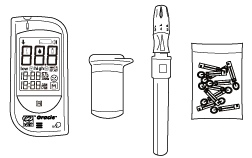
Be sure to read this section and the test strip package insert found in the test strip box carefully before testing. Make sure you have all items needed to test:
- Blood Glucose Meter
- Test Strip
- Lancing Device
- Sterile Lancet
 WARNING
To reduce the chance of infection:
- Never share a lancet or the lancet device with anyone.
- Always use a new, sterile lancet. Lancets are for single use only.
- Avoid getting hand lotion, oils, dirt, or debris in or on the lancets and the lancet device.
Testing Procedure
WASH AND DRY YOUR HANDS FIRST BEFORE STARTING.
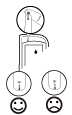
STEP 1 Set the Lancing Device

Unscrew the cap of Lancing Device.
Insert a lancet into the lancet holder and push down firmly until it is fully seated.
Twist the protective disk until it separates from the lancet.
Replace the lancing device cap. Turn the cap until it is snug but not too tight.
The adjustable tip offers 5 levels of skin penetration. Twist the adjustable tip in either direction until the number lines up with the Arrow:
1-2 for soft or thin skin, 3 for average skin,
4-5 for thick or calloused skin.

Slide the ejection/cocking control back until it clicks.
If it does not click the device may have been cocked when the lancet was inserted.
Blood from sites other than the fingertip
A clear cap, included with the kit, makes it easier to get a drop of blood for AST.
When you want to obtain blood from sites other than the finger, replace the lancing device cap with the clear cap.
Turn the clear cap until it is snug but not too tight, and then Slide the ejection/cocking control back until it clicks.
The lancing device is now ready for use. Set aside for later use.
STEP 2 Insert the Test Strip

Insert a test strip with contact bars end first and facing up, into the test slot.
The meter turns on automatically and displays the followings in sequence:
“CH” and “

” ---> ambient temperature ---> date, time and flashing “

”
STEP 3 Get a Drop of Blood

Select the puncture site either in finger or in other parts (AST).
Clean the puncture site with 70% alcohol cotton and let it air-dry.
• Fingertip
Hold the lancing device firmly against the side of your finger.
Press the release button.
You will hear a click, indicating that the puncture is complete.
• Sites other than fingertip
Please refer to the section of “About AST” for available punctured sites.
After penetration, discard the first drop of blood with a clean tissue paper or cotton.
Then gently squeeze the punctured area to obtain blood.
But be attention NOT to smear the blood sample.
The volume of blood sample must be at least 0.7 microliter ( actual size).
STEP 4 Apply blood into the test strip
When “
“ is flashing on the screen,
apply your blood to the absorbent hole of the test strip until the confirmation window is fully covered with blood.
The meter then begins to count down automatically.
STEP 5 Obtain an Accurate Result in 6 Seconds

The result of your blood glucose test is shown after the meter counts to 0.
This reading is automatically stored in the meter.
PLEASE NOTE
- Do not push your finger (with blood on it) against the test strip or try to apply a smeared sample on the test strip.
- If you do not apply a blood sample to the test strip within 3 minutes, the meter will automatically turn off.
You must remove and reinsert the test strip to restart the test procedure.
- The blood should completely fill the confirmation window before the meter begins to count down.
If you find that the confirmation window is not filled with blood when the meter is counting, NEVER try to add more blood to the test strip.
Discard the test strip and retest with a new one.
- If you have trouble filling the test strip, please contact customer service for help.
STEP 6 Remove the Lancet.
 Always use caution when removing the lancet.
Take the lancet out carefully. Place the disk on a hard surface and push the exposed tip into the protective disk.
WARNING
The used lancet and the used test strip may potentially be a biohazard.
Please discard it carefully according to your local regulations.
Expected Test Results
Blood glucose monitoring plays an important role in diabetes control.
A long-term study showed that keeping blood glucose levels close to normal can reduce the risk of diabetes complications by up to 60%*
3.
The results you get with the EZ Health
® Oracle
® system can help you and your healthcare professional monitor and adjust your treatment plan to gain better control of your diabetes.
| Time of day |
Glucose range for people without diabetes |
Your target range
(mmol/L) |
| Fasting and before meal* |
4.0 – 7.0 mmol/L |
_______ (mmol/L) |
| 2 hours after meals* |
5.0 - 10.0 mmol/L
(5.0 - 8.0 mmol/L if A1C targets not being met). |
_______ (mmol/L) |
* Source: CDA Clinical Practice Guidelines 2008
Treatment goals should be tailored to the individual.
Glycemic targets for children less than or equal to 12 and pregnant women differ from these targets.
*3: American Diabetes Association position statement on the Diabetes Control and Complications Trial(1993).
Please work with your doctor to determine a target range that works best for you.