INTRODUCTION OF THE SYSTEM
Intended Use
The system is intended for use outside the body (in vitro diagnostic use).
It should be used only for testing glucose (sugar) and only with fresh capillary
whole blood samples taken from the finger and the alternative sites including the palm,
the forearm, the upper arm, the calf and the thigh. The system is intended for home use and in clinical settings.
It should not be used for the diagnosis of diabetes or for the testing of newborns.
Principle of Measurement
The test is based on the measurement of electrical current generated by the reaction of glucose with the reagent of the strip.
The meter measures the current and displays the corresponding blood glucose level.
The strength of the current produced by the reaction depends on the amount of glucose in the blood sample.
Contents of the System
The system should be used with three main products: the blood glucose meter, test strips, and a control solution.
These products have been designed, tested, and proven to work together as a system to produce accurate blood glucose test results.
Use only the EZ Health
® Oracle
® test strips and EZ Health
® Oracle
® or Autocode® control solution with your EZ Health
® Oracle
® meter.
Your system includes:
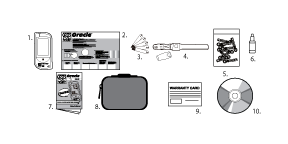
- A meter
- Your first time using guide
- Test strips (sold separately)
- Lancing Device with clear cap
- 10 Sterile lancets
- Control solution (Optional)
- Owner’s manual
- Sporty carrying case
- Warranty card
PLEASE NOTE
- Check your system to be sure that it is unopened prior to use and that it contains all parts listed above. If either of these conditions occurred, please return your system to the place of purchase.
- Please note that strips and control solutions are optional. Those are not included in the standard kit. Please ask your local agent or call toll free (866) 829-7926 for help.

Appearance and Key Function of the Meter
TEST SLOT
The test slot is where you insert the test strip for testing. The meter will turn on automatically when you insert a test strip.
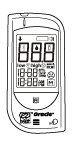
DISPLAY
Your test results are displayed here. The large, easy-to-read display guides you through the test using symbols and simple messages.
MAIN BUTTON
The main button in front of the meter is used to set up the meter, enter the memory mode, change the value of “date time”, unit setting, memory deleting and turn the meter on and off.
TALKING SYMBOL -

Indicates that the meter contains speaking function.

DATA PORT
Located at the side, is for cable connection
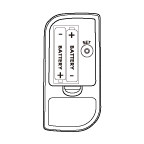
SET BUTTON (in the back)
Set the date, time and unit, located in the battery compartment.
Meter Display Segments
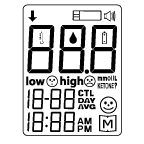
Test Strip Symbol

Appears when the meter is on.
Blood Drop Symbol

This symbol tells you when to apply the sample.
Temperature Symbol

Appears with ambient temperature after inserting a test strip.
Face Symbol low/high
Both are result indicators.

Face low symbol appears when test result is between 1.1 to 3.8 mmol/L.

Face high symbol appears when test result is greater than 6.6 mmol/L.
CTL Symbol
CTL
Appears when performing a control solution test and indicates that the result will not be stored in the memory.
Day Average

Indicates that the displayed test result is an average.
Date
Time
Memory Symbol

Appears when you review the memory.
Test Result Area
Test results are displayed here.
Voice Symbol

Indicates speaking function is on/off.
Battery Symbol

Appears when the battery is low.
Measurement unit
mmol/L
Appears with the test result in mmol/L.
Ketone Warning
KETONE?
Appears when the test result is equal or higher than 13.3mmoI/L.
Smile Symbol

Appears when the test result is within reference range.
Speaking Function
When the talking symbol
is on the meter, it means that the meter provides speaking function.
It “speaks” step by step and leads you through a blood glucose test.
The following table tells you when and what the meter “speaks”.
WHEN
does the meter speak? |
WHAT
does the meter speak? |
| When meter is turned on. |
Welcome music plays.
"Thank you for using this product.
Please relax during measurement." |
| When room temperature is detected. |
"The room temperature is (number)
degree Celsius/ Fahrenheit." |
| When room temperature is outside operating range. |
"Room temperature is out of range,
thus unable to measure." |
When the meter is ready to test.
( "" symbol appears on display) |
"Please apply blood into the strip." |
When the test is completed.
(The result appears on display). |
"Your blood glucose is (number)
Millimole per Liter" |
When the test result is outside
measurement range, which is 1.1
to 33.3 mmol/L. |
"The blood glucose is out of range,
thus unable to measure." |
Appearance of the Test Strip
Your system measures the amount of sugar (glucose) in whole blood.
Blood is applied to the absorbent hole of the test strip and is automatically drawn into
the reaction cell where the reaction takes place.

The test strip consists of the following parts:
Contact Bars
Insert this end of the test strip into the meter.
Push it in firmly until it will go no further.
Test Strip Handle
Hold this part to insert the test strip into the slot.
Confirmation Window
This is where you confirm if enough blood has been applied to the absorbent hole of the strip.
Absorbent Hole
Apply a drop of blood here. The blood will be drawn automatically.
See pages 27~33 (in your user manual), Testing Your Blood, for complete instructions.