BEFORE TESTING
Checking with EZ Health® Oracle® or Autocode® Control Solutions
EZ Health
® Oracle
® and Autocode® control solutions contain a known amount of glucose that reacts with test strips.
By comparing your control solution test results with the expected range printed on the test strip vial label, it is able to check that the meter
and the test strips are working together as a system and that you are performing the test correctly.
It is very important that you do this simple check routinely to make sure you get accurate results.
When should the control solution test be performed?
- Whenever you suspect that the meter or test strips are not working properly.
- When your blood glucose test results are not consistent with how you feel, or when you think your results are not accurate.
- When your test strips are exposed to extreme environmental conditions (See Storage section of this manual).
- When you want to practice running the test.
- If you drop the meter.
Important Control Solution Information
- Use Only EZ Health® Oracle® and Autocode® control solutions.
- Check the expiration date on the control solution vial. Do not use if expired.
- Control solution, meter, and test strips should come to room temperature (20-25°C/68-77°F) before testing.
- Shake the vial, discard the first drop of control solution, and wipe off the dispenser tip to ensure a good sample and an accurate result.
- Use only for 90 days after first opening. Record the discard date (date opened plus 90 days) on the control solution vial. Discard after 90 days.
- Store the control solution tightly closed at temperatures below 30°C (86°F).
- Do not refrigerate.
PLEASE NOTE
The control solution range printed on the test strip vial is for EZ Health
® Oracle
® or Autocode® control solution only.
It is used to test meter and test strip performance. It is not recommended range for your blood glucose level.
Performing a Control Solution Test
 STEP 1
 Insert the Test Strip
Insert a test strip with contact bars end first and facing up, into the test slot.
The meter turns on automatically and displays the followings in sequence:
"CH" and "

" --> ambient temperature
--> date, time and flashing "

"
WARNING
- Contact bars must be inserted all the way into the meter or you may get an inaccurate test result.
- Every time you perform a control solution test, you must enter into the “CTL” test mode so that the test result will not be stored in the meter memory.
Failure to do so will confuse the blood glucose test result with the control solution test result in memory.
 STEP 2
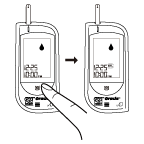
 Press the

button
While the “
” symbol appears on the display, press the
button and then “CTL” will appear on the display.
With the “CTL” sign on the display, the meter will not store your test result in memory.
If you decide not to perform a control solution test, press the
button again, and the “CTL” sign will disappear.
 STEP 3
 Obtain Control Solution.
Shake the control solution vial well.
Remove the cap.
Squeeze the vial, discard the first drop, and wipe off the dispenser tip to prevent contamination.
Squeeze the vial again to get another drop and place the drop on your fingertip first.
 STEP 4
 Apply Control Solution.
Move your finger (with control solution on it) to meet the absorbent hole of the test strip
and the drop will be automatically drawn into the test strip.
Remove your finger until the confirmation window is filled.
The meter begins to count down.

To avoid contaminating the control solution with the content of the test strip,
you have to place a drop of control solution on a clean surface or on your finger tip first.
Then touch the test strip to the drop.
 STEP 5
 Read and Compare the Result.
After counting to 0, the test result of control solution is shown on the screen.
Compare this result with the range printed on the test strip vial.
It should fall within this range.
Out-of-range results
If test results fall outside the range printed on the test strip vial, check the section of “Problem in Operation” in troubleshooting guide and repeat the test.
If you continue to get out-of-range results, it means that the system may not be working properly.
Do NOT test your blood. Contact your local Customer Care Line at (866) 829-7926 for help.